RecyclerView相对于ListView拥有更高的性能和扩展性
不过如果理解了ListView的性能优化,就能对RecyclerView有更深刻的认识
有关ListView的优化,可阅读上一篇博文《ListView的创建和优化》
基本使用方法(纵向滚动)
由于RecyclerView是新增控件,在使用之前需要在app/build.gradle文件中添加其依赖
1
2
3
4
| dependencies {
implementation 'androidx.recyclerview:recyclerview:1.1.0'
}
|
然后我们修改布局文件,为其添加一个RecyclerView控件
1
2
3
4
| <androidx.recyclerview.widget.RecyclerView
android:id="@+id/recyclerView"
android:layout_width="match_parent"
android:layout_height="match_parent"/>
|
由于RecyclerView并没有内置在系统SDK中,所以需要写出完整的包路径
接着我们为其创建一个适配器
1
2
3
4
5
6
7
8
9
10
11
12
13
14
15
16
17
18
19
20
21
22
23
24
25
26
27
28
|
class FruitAdapter(val fruitList:List<Fruit>): RecyclerView.Adapter<FruitAdapter.ViewHolder>() {
inner class ViewHolder(view:View):RecyclerView.ViewHolder(view){
val fruitImage:ImageView = view.findViewById(R.id.fruitImage)
val fruitName:TextView = view.findViewById(R.id.fruitName)
}
override fun onCreateViewHolder(parent: ViewGroup, viewType: Int): ViewHolder {
val view = LayoutInflater.from(parent.context).inflate(R.layout.fruit_layout,parent,false)
return ViewHolder(view)
}
override fun onBindViewHolder(holder: ViewHolder, position: Int) {
val fruit = fruitList[position]
holder.fruitImage.setImageResource(fruit.imageId)
holder.fruitName.text = fruit.name
}
override fun getItemCount(): Int {
return fruitList.size
}
}
|
最后修改MainActivity,开始使用RecyclerView
1
2
3
4
5
6
7
8
9
10
11
12
13
14
15
16
17
18
19
20
21
22
23
24
25
26
27
28
29
| class MainActivity : AppCompatActivity() {
private val fruitList = ArrayList<Fruit>()
override fun onCreate(savedInstanceState: Bundle?) {
super.onCreate(savedInstanceState)
setContentView(R.layout.activity_main)
initfruit()
val layoutManager = LinearLayoutManager(this)
recyclerView.layoutManager = layoutManager
val adapter = FruitAdapter(fruitList)
recyclerView.adapter = adapter
}
private fun initfruit(){
repeat(2){
fruitList.add(Fruit("Apple",R.drawable.apple_pic))
fruitList.add(Fruit("Banana",R.drawable.banana_pic))
fruitList.add(Fruit("Orange",R.drawable.orange_pic))
fruitList.add(Fruit("Watermelon",R.drawable.watermelon_pic))
fruitList.add(Fruit("Pear",R.drawable.pear_pic))
fruitList.add(Fruit("Grape",R.drawable.grape_pic))
fruitList.add(Fruit("Pineapple",R.drawable.pineapple_pic))
fruitList.add(Fruit("Strawberry",R.drawable.strawberry_pic))
}
}
}
|
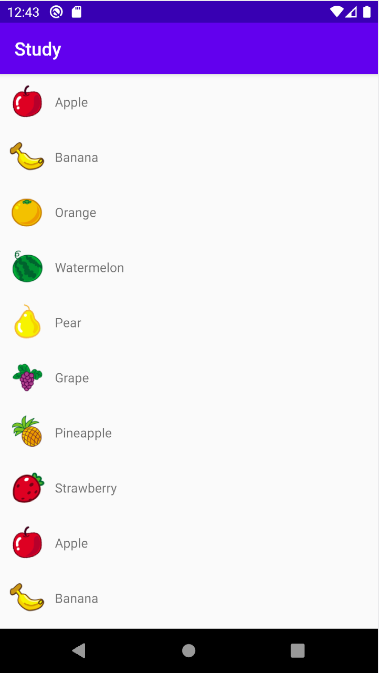
ListView的布局排列是由自身去管理的,而RecyclerView则将这个工作交给了LayoutManager.
LayoutManager有一套可扩展的布局排列接口,子类只要按照接口的规范来实现,就能实现不同排列方式的布局
效果如下(水果图源:《第一行代码》第三版)
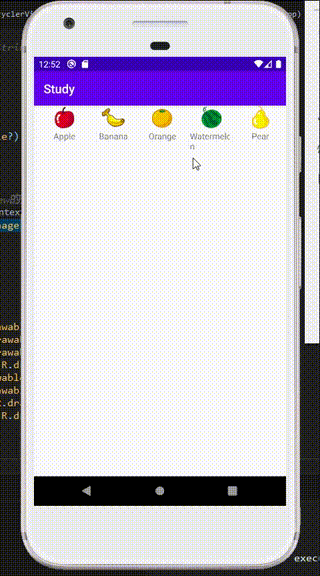
横向滚动效果实现
由纵向滚动变为横向滚动十分的简单
首先我们要改变子项布局元素的排列方式为垂直
1
2
3
4
5
6
7
8
9
10
11
12
13
14
15
16
17
18
| <?xml version="1.0" encoding="utf-8"?>
<LinearLayout xmlns:android="http://schemas.android.com/apk/res/android"
android:orientation="vertical"
android:layout_width="80dp"
android:layout_height="wrap_content">
<ImageView
android:id="@+id/fruitImage"
android:layout_width="40dp"
android:layout_height="40dp"
android:layout_gravity="center_horizontal"
android:layout_marginLeft="10dp" />
<TextView
android:id="@+id/fruitName"
android:layout_width="wrap_content"
android:layout_height="wrap_content"
android:layout_gravity="center_horizontal"
android:layout_marginLeft="10dp"/>
</LinearLayout>
|
然后在MainActivity中调用LinearLayoutManager的setOrientation()方法来设置布局的排列方式,只需要添加一行代码即可
1
2
3
4
5
6
7
8
9
10
11
12
13
14
| class MainActivity : AppCompatActivity() {
override fun onCreate(savedInstanceState: Bundle?) {
super.onCreate(savedInstanceState)
setContentView(R.layout.activity_main)
val layoutManager = LinearLayoutManager(this)
layoutManager.orientation = LinearLayoutManager.HORIZONTAL
recyclerView.layoutManager = layoutManager
}
}
|
效果如下
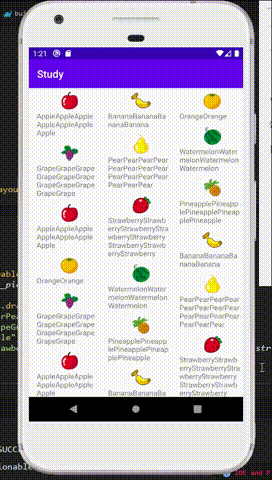
瀑布流效果实现
先修改子项的布局文件
1
2
3
4
5
6
7
8
9
10
11
12
13
14
15
16
17
18
19
| <?xml version="1.0" encoding="utf-8"?>
<LinearLayout xmlns:android="http://schemas.android.com/apk/res/android"
android:orientation="vertical"
android:layout_width="match_parent"
android:layout_height="wrap_content"
android:layout_margin="5dp">
<ImageView
android:id="@+id/fruitImage"
android:layout_width="40dp"
android:layout_height="40dp"
android:layout_gravity="center_horizontal"
android:layout_marginLeft="10dp" />
<TextView
android:id="@+id/fruitName"
android:layout_width="wrap_content"
android:layout_height="wrap_content"
android:layout_gravity="left"
android:layout_marginLeft="10dp"/>
</LinearLayout>
|
由于瀑布流布局的宽度应该是根据列数来自动适配的,因此LinearLayout的宽度应改为match_parent。
使用layout_margin来让子项之间留一点间距
TextView改为左对齐,比较美观
最后,只需要修改MainActivity的onCreate()方法中的一行代码即可
1
2
3
4
5
6
7
8
| class MainActivity : AppCompatActivity() {
val layoutManager = StaggeredGridLayoutManager(3,StaggeredGridLayoutManager.VERTICAL)
recyclerView.layoutManager = layoutManager
}
|
StaggeredGridLayoutManager的构造方法接受两个参数
第一个参数表示列数
第二个参数表示布局的排列方式,我们这里设置了垂直排列
效果如下
添加点击事件
修改FruitAdapter类中的onCreateViewHolder()方法
1
2
3
4
5
6
7
8
9
10
11
12
13
14
| override fun onCreateViewHolder(parent: ViewGroup, viewType: Int): ViewHolder {
val view = LayoutInflater.from(parent.context).inflate(R.layout.fruit_layout,parent,false)
val viewHolder = ViewHolder(view)
viewHolder.itemView.setOnClickListener{
val position = viewHolder.adapterPosition
val fruit = fruitList[position]
Toast.makeText(parent.context,"Click ${fruit.name}",Toast.LENGTH_SHORT).show()
}
return viewHolder
}
|
上述中itemView代表最外层布局,也可以将其改为任意布局中的控件(比如fruitImage)
RecyclerView的强大之处也在于此,它可以实现任意子项中任意控件或者布局的点击事件